Create ADMA Resources
The example Python source code is meant merely as a starting point to quickly interact and retrieve insights from ADMA. It is in no way intended for production workloads.
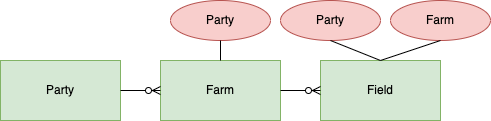
Data Model
Once you have successfully generated a JWT, you are ready to execute the additional provided examples.
ADMA has the concept of a Party, Farm and Field. These are the only three entities that you need to use in order
to follow the remainder of this tutorial.
Party
Let's first start by creating a Party and then getting that same entity. With the Python virtual environment still
activated, execute the following command. This will obtain a valid JWT and create a Party with a random UUID as the
id of the Party. Note this id as we will use it to later retrieve the newly created Party.
Create Party
python -m tutorial.example.create_party
The Party output should have the following structure.
{
  "id": "551c7fb3-8b9c-4b5c-8ecc-d6830325ce12",
  "eTag": "f6004448-0000-0100-0000-65ca8cab0000",
  "createdDateTime": "2024-02-12T21:24:59Z",
  "modifiedDateTime": "2024-02-12T21:24:59Z",
  "name": "Example",
  "description": "My Example Party",
  "createdBy": "80cbe130-8789-401f-b44b-f8931ace9684",
  "modifiedBy": "80cbe130-8789-401f-b44b-f8931ace9684"
}
Get Party
Note that you will need to modify line 12 in tutorial/example/get_party.py to add the UUID of the Party in order to
retrieve it.
python -m tutorial.example.get_party
The Party output should have the following structure.
{
  "id": "551c7fb3-8b9c-4b5c-8ecc-d6830325ce12",
  "eTag": "f6004448-0000-0100-0000-65ca8cab0000",
  "createdDateTime": "2024-02-12T21:24:59Z",
  "modifiedDateTime": "2024-02-12T21:24:59Z",
  "name": "Example",
  "description": "My Example Party",
  "createdBy": "80cbe130-8789-401f-b44b-f8931ace9684",
  "modifiedBy": "80cbe130-8789-401f-b44b-f8931ace9684"
}
Farm
Next, we have Farm. Let's continue by creating a Farm and then getting that same entity. Execute the following
command. This will create a Farm with a random UUID as the id of the Farm. Note this id as we will use it to later
retrieve the newly created Farm.
Create Farm
Note that you will need to modify line 13 in tutorial/example/create_farm.py to add the UUID of the Party in order
to create the farm.
python -m tutorial.example.create_farm
The Farm output should have the following structure. Note now that the Farm has an association with the Party.
{
  "partyId": "551c7fb3-8b9c-4b5c-8ecc-d6830325ce12",
  "id": "7e0a12a8-fd60-4ebb-bab1-6d82ba076bfd",
  "eTag": "f700a26e-0000-0100-0000-65ca9c6f0000",
  "createdDateTime": "2024-02-12T22:32:15Z",
  "modifiedDateTime": "2024-02-12T22:32:15Z",
  "name": "Example",
  "description": "My Example Farm",
  "createdBy": "80cbe130-8789-401f-b44b-f8931ace9684",
  "modifiedBy": "80cbe130-8789-401f-b44b-f8931ace9684"
}
Get Farm
Note that you will need to modify lines 12-13 in tutorial/example/get_farm.py to add the UUID of the Party and
Farm in order to retrieve the Farm.
python -m tutorial.example.get_farm
The Farm output should have the following structure.
{
  "partyId": "551c7fb3-8b9c-4b5c-8ecc-d6830325ce12",
  "id": "7e0a12a8-fd60-4ebb-bab1-6d82ba076bfd",
  "eTag": "f700a26e-0000-0100-0000-65ca9c6f0000",
  "createdDateTime": "2024-02-12T22:32:15Z",
  "modifiedDateTime": "2024-02-12T22:32:15Z",
  "name": "Example",
  "description": "My Example Farm",
  "createdBy": "80cbe130-8789-401f-b44b-f8931ace9684",
  "modifiedBy": "80cbe130-8789-401f-b44b-f8931ace9684"
}
Field
Finally, we have Field. Let's continue by creating a Field and then getting that same entity.
Create Field
Before we can execute the next command, we need geoJSON of the field we intend to add. Once we have this, then we
can execute the following command. To make this easier, there is a sample geoJSON, resource/el.geojson, and we can
use it. The included geoJSON will create a Field in the state of Illinois within the United States. This will create
a Field with a random UUID as the id of the Field. Note this id as we will use it to later retrieve the
newly created Field.
Note that you will need to modify lines 13-14 in tutorial/example/create_field.py to add the UUID of the Party
and Farm in order to create the Field.
python -m tutorial.example.create_field
The Field output should have the following structure. Note now that the Field has an association with the Party
and the Farm.
{
  "farmId": "7e0a12a8-fd60-4ebb-bab1-6d82ba076bfd",
  "partyId": "551c7fb3-8b9c-4b5c-8ecc-d6830325ce12",
  "id": "b159f824-4d12-4b40-aa38-b98f0c876edf",
  "eTag": "0e019325-0000-0100-0000-65cbd14c0000",
  "createdDateTime": "2024-02-13T20:30:04Z",
  "modifiedDateTime": "2024-02-13T20:30:04Z",
  "geometry": {
    "type": "Polygon",
    "coordinates": [
      [
        [-87.6406186, 40.7167052],
        [-87.6312447, 40.7168508],
        [-87.631369, 40.7203465],
        [-87.6360857, 40.7202482],
        [-87.6362228, 40.7238764],
        [-87.6409006, 40.7237951],
        [-87.6406186, 40.7167052]
      ]
    ]
  },
  "name": "El",
  "description": "Illinois, United States",
  "createdBy": "80cbe130-8789-401f-b44b-f8931ace9684",
  "modifiedBy": "80cbe130-8789-401f-b44b-f8931ace9684"
}
Get Field
Note that you will need to modify lines 12-13 in tutorial/example/get_field.py to add the UUID of the Party
and Field in order to retrieve the Field.
python -m tutorial.example.get_field
The Field output should have the following structure.
{
  "farmId": "7e0a12a8-fd60-4ebb-bab1-6d82ba076bfd",
  "partyId": "551c7fb3-8b9c-4b5c-8ecc-d6830325ce12",
  "id": "b159f824-4d12-4b40-aa38-b98f0c876edf",
  "eTag": "0e019325-0000-0100-0000-65cbd14c0000",
  "createdDateTime": "2024-02-13T20:30:04Z",
  "modifiedDateTime": "2024-02-13T20:30:04Z",
  "geometry": {
    "type": "Polygon",
    "coordinates": [
      [
        [-87.6406186, 40.7167052],
        [-87.6312447, 40.7168508],
        [-87.631369, 40.7203465],
        [-87.6360857, 40.7202482],
        [-87.6362228, 40.7238764],
        [-87.6409006, 40.7237951],
        [-87.6406186, 40.7167052]
      ]
    ]
  },
  "name": "El",
  "description": "Illinois, United States",
  "createdBy": "80cbe130-8789-401f-b44b-f8931ace9684",
  "modifiedBy": "80cbe130-8789-401f-b44b-f8931ace9684"
}